


Making the masks does require some advance preparation, but I can promise it will be worth it! I kept a sample book each year to show to my class on the first day of school and kept it on display all year as an additional motivator for writing and for polishing writing pieces to be portfolio-worthy. The "mask books" were an enticement as well as a goal for so many students, even the most reluctant of writers.
I came up with the idea of creating a mask book while attending a conference on portfolios long ago. I attended a session on the "showcase portfolio" and was surprised to find that the definition of "showcase" meant summative assessments in plastic sleeves housed in a plain black binder. My inner art teacher was frantically searching for the nearest exit when my mind started to wander. Instead of bolting from the room, I began sketching out my ideas for my own interpretation of "showcase". The word showcase, to me, conjures up a sparkling celebration of the journey each student makes in our year together. That celebration deserves a home that shows the joy to be found inside!
If you try this for even one time, be prepared that it becomes the stuff of legend. Students will show them to other students who will then want to be in your class! Also be prepared to have your teammates ask if they can take your class so you can create masks with their students. Of course! By following the easy steps listed below, you can recreate the magic of mask book making in your school!
Supplies
- For each child, a blank hardcover book, such as this one from Treetop Publishing. PP14 on page 9 of this catalog is the one I use.
- Plaster-infused cloth strips 8" wide. One 20-lb box per class. (I bought these at local art supply stores, and in recent years was able to order them from Amazon.)
- Large foil food prep pans - One for every three students (Purchased at Gordon's Food Service, but also available at super markets and party stores. Think turkey-sized!)
- Non-latex gloves (One box is fine. Only the adults need them to protect gel and acrylic nails!)
- One pair of large adult scissors for every three students.
- One bottle of baby oil.
- Small paper cups - one per student. I use the tiny bathroom cups from Costco.
- Two or three large trash bags, cut horizontally in strips. (Or ask each student with long hair to bring an old stretchy headband.)
- Clean empty Cool Whip containers (or similar plastic containers) for water
- Oversized old T-shirt or button down shirt for each student to wear as a coverup
- Lots of old sheets to cover chairs and the floor
- Acrylic Paints and Acrylic Glaze, star wire, hot glue, markers, crayons, (optional: glitter, feathers, ribbons, crystals, sequins)
- Permanent glue sticks to glue pages into book.

Volunteers and Permission
Two to three weeks before your mask-making event, send a letter home to parents/guardians to explain the project, asking for help, and also asking for a donation to cover the costs. There are many ways to fund this project. More suggestions will be offered below. I always found one or two moms who loved the project so much that they continued to volunteer even after their children had moved on. The first year will be the most challenging one to recruit volunteers. After you do this one time, parents may be lining up to have a chance to help!
Here is a sample text of the letter you may want to send:


Before the Event
- Assemble all materials and begin to cut the plaster strips. Students love to help with this. Can be a guided center activity, or done after school with helpers. Spread a sheet under your working table to catch extra plaster dust.
- Cut plaster strips in the following approximate dimensions: 8"x 2", 8"x1", 4"x2", 4"x1", and cut triangles from some of the 8"x2" strips.
- Place the strips in one of the large foil pans.
- Prepare a similar pan for each group of three you plan to have for your class.
- If preparing for multiple classes, you can use the same pans and replenish them between sessions.
- Do a demonstration.I like to do this the day before and invite the parent volunteers.
- With parent permission in hand, select a volunteer to be the model for a sample.
- Remove all jewelry from your hands or wear gloves.
- Student model dons old shirt and sits on chair or stool. (I prefer a higher stool for this because I have some, and because it's easier on my back when I sculpt!)
- Student, seated, receives a small amount of baby oil in paper cup, and applies it as if it is sunblock. Hair should be held back from face with either a headband or a strip made from a garbage bag tied to hold hair back.
- Have a container of water and the foil pan of plaster strips nearby.
- Enlist a student assistant to hand you the bandages.You dip each bandage in the water and get rid of excess water by sliding two fingers along the bandage over the bowl.
- Begin by outlining the model's face with four long wide bandages. Place an additional bandage between upper lip and nose. (Agree to call the bandage sizes "long thick", "long thin", "short thick", "short thin" and "triangle" for ease in communication between sculptor and assistant.

- Working from outside in, add a strip covering the top of the nose, stopping at the nostrils. (Eyes, mouth, and nostrils should remain exposed throughout. Students will be more comfortable if they keep their eyes closed.) It is an absolute MUST that the model does not make any facial expressions through talking or smiling or expressing any other emotions during the mask creation and drying time (about 40 minutes total). Expressions or talking will weaken the masks and it will not stand up on the book.

- Continue adding strips of moistened plaster until one layer is complete. Add a second layer.BE sure to smooth as much as possible with your fingers until the plaster blends and the tiny holes disappear.
- Move student to a chair to dry. This child can also act as an assistant for the new sculptor and model in his/her group of three as long as the mask is not dripping around the eyes. (Shouldn't be, as long as the excess moisture was removed before each strip was applied.)
- After the mask has dried (so it sounds hollow when you tap it with a fingernail - you'll quickly get used to this sound), gently remove it by gripping both sides and asking the student inside to "make monster faces", scrunching and unscrunching his/her face until the mask loosens.
- Write the name of the student in pencil inside the mask and set on table or drying rack to completely dry overnight.

Mask Making in Groups
- Assign students to groups of three: Sculptor, Model, and Assistant. This will be the most efficient model for you to work with if you are the lone adult in the room. Parent volunteers, depending on how many are available, can stay with one group or can travel between groups. Parents can also assist students who are making hand masks. (For hand masks, apply to top of hands only and smooth on in two layers. allow to dry as for face masks before removing. This is, by the way, a great option for some of the ASD kids who may be part of your class. Kids are different, so of course all should have a choice!)
- The assistant has an important role: keeping the plaster strips dry until needed, handing each strip to the sculptor, and cutting additional strips to place in the foil pan.
- The role of the sculptor is detailed above. Don't forget the baby oil as your first step!
- The role of the model is to stay still and quiet during the process.(You will love the quiet spa-like atmosphere during mask-making. Try playing some soft music in the background!)
- Only adults should be the ones to remove the masks, and they must be dry before attempting this. Remind the models to scrunch their faces for an easy removal.


Finishing
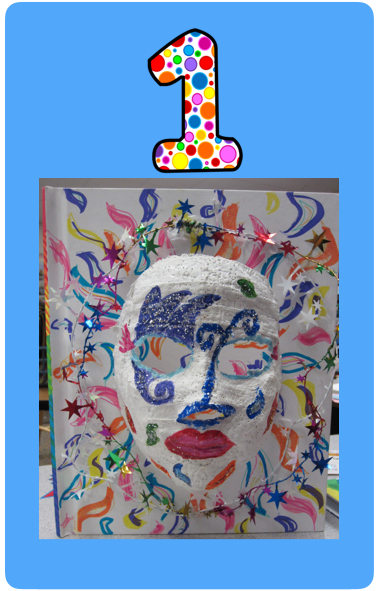
Masks can be easily trimmed with scissors at any point after drying. I trim some of them just to even them out, trimming some a little more to make them contact the book surface when gluing on.
- Students can begin decorating blank book covers and gluing in their special pages days or even weeks in advance of the actual mask making. I keep all of these in a special file in our writing center so students can get to them when they have a moment to work on them. They shouldn't be kept in desks. (I'm sure you know why!)
- Pages are best glued in by covering the perimeter of the page with glue stick and then making a giant X from corner to corner on the page.
- Masks are painted with acrylic paints. Glitter is best added while the paint is wet.
- Allow to dry overnight and apply a coat of acrylic glaze. Allow to dry overnight again.
- Masks are glued onto the book covers using hot glue. This will make them stay put for years!
- Add star wire. sequins, ribbons, etc. as you wish with hot glue for the star wire and craft glue for all else.

Making It Happen
If you have read this far, I think you can see that this is not a print-and-go, ready in a snap kind of activity. Those certainly have their place in all of our teaching lives. This one, though, creates a keepsake treasured by students and their families for years to come. It occupies a special place of honor in many homes while the print-and-go sheets may be in dusty attics or basement folders or long since recycled.
I so hope you'll give it a try. I realize that it's a pricy project, and for many years I just paid for it myself. (What? A teacher paying herself for classroom supplies? Oh come on! You know that you do it yourself. I won't even ask you the amounts.) When I finally got brave enough to ask parents for help with funding, I was so happily surprised at their willingness to pay for this experience. Several even paid double or triple to help a family who truly couldn't afford it.
Here are a few fundraising ideas for you in addition:
- Ask your PTA for help in funding.
- Have a Poetry Coffee House. Invite parents and other community members to come and have a cookie or two while they listen to your amazing young authors read aloud from their files waiting to be glued in. If you are still lucky enough to have a local book store in your area, they might love to host this. If not, try an ice cream shop.
- Write a grant.
- Ask your students to offer extra chores at home for pay until they earn the price of their book.
- Sponsor a car wash.
- Try Donors Choose. You might be pleasantly surprised at how many people would like to help you keep the arts in our children's lives.
Okay, teacher friends, you have all summer to think about this one and get an early start on keepsake portfolios when school begins again! I would love, love, love to hear from you if you give it a try! Just comment below!
For other June and beyond ideas, please visit my Teacher Talk blogging buddies!


Retta, when I was in 5th grade, my art teacher had us make masks. It was a BIG deal, and one of my favorite memories of elementary school. I kept that mask proudly for years. I'm not quite sure it isn't still at my parents' house. All this is to say to teachers, "Do it!" It's such a special memory, and I love the idea of using it to showcase writing! Thanks for taking the time to provide directions. :)
ReplyDeleteI want you as my teacher!! I'm pinning this post to remember to do it next year! This is fantastic!
ReplyDeleteOh Retta! I loved reading about this project and the fabulous keepsake you facilitated with your kids. LOVE, LOVE, LOVE!
ReplyDeleteDonors Choose here I come...I can't wait to do this next year...
ReplyDelete-Vicky
What great activity. Could do this for my greek play unit.
ReplyDeleteThese are so beautiful, Retta!
ReplyDeleteI am continually impressed by the quality of content on your website. Thank you for all the valuable information!
ReplyDelete